Live Photos have completely changed how iPhone users capture memories. Instead of freezing a single moment, this feature records a few seconds of motion and sound, making every shot feel more alive and immersive. While watching individual Live Photos is fun, many users still don’t know that multiple Live Photos can be combined into a single video directly on the iPhone.
- What You Need To Know About Live Photos
- Steps To Convert Multiple Live Photos To Video
- Step 1: Launch The Photos Application
- Step 2: Navigate To Collections
- Step 3: Access Your Live Photos Collection
- Step 4: Choose Your Live Photos
- Step 5: Access The Menu Options
- Step 6: Create Your Video
- Locating Your Newly Created Video
- Sharing And Using Your Video
- Conclusion
Creating a video from Live Photos is a great way to relive special moments like birthdays, vacations, family gatherings, or even everyday memories. Instead of endlessly scrolling through your gallery, you can turn those moments into one smooth, shareable video. This simple guide explains the entire process step by step, making it easy even if you’re doing it for the first time.
What You Need To Know About Live Photos
More Read

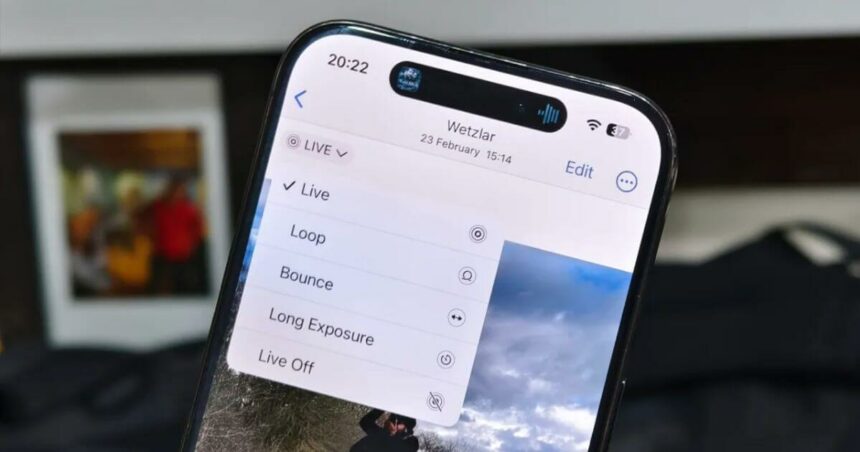
Before diving into the conversion process, it’s helpful to understand how Live Photos work on iPhone and iPad. When you capture a Live Photo, your device records a short video clip alongside the still image. This creates that magical moving effect when you press and hold the photo in your gallery.
The beauty of combining Live Photos into a video is that you’re essentially stringing together these short clips to create a longer, more meaningful compilation. Whether you have five Live Photos from a sunset or twenty from a concert, the Photos app makes it incredibly easy to merge them without using any third-party apps.
Steps To Convert Multiple Live Photos To Video
Step 1: Launch The Photos Application
Start by opening the Photos app on your iPhone. This is the default gallery app with the colorful flower icon and comes pre-installed on all iOS devices. Once opened, you’ll see your photo library displayed in chronological order.
Step 2: Navigate To Collections
In the Photos app’s bottom navigation bar, tap on Collections. This view organizes your photos into different categories, making it easier to find specific types of media on your device.
Step 3: Access Your Live Photos Collection
Scroll down until you find the Media Types section. Tap on Live Photos to display only the Live Photos stored on your iPhone. This filtered view saves you time by showing exclusively the photos you need, rather than scrolling through your entire camera roll.
Step 4: Choose Your Live Photos
In the top-right corner of the screen, tap Select. Now you can choose which Live Photos you want to include in your video. Simply tap each Live Photo you want to add, and a blue checkmark will appear on selected items. You can select as many or as few as you like, depending on how long you want your final video to be.
Step 5: Access The Menu Options
After selecting all desired Live Photos, look for the three-dot menu icon in the top-right corner of your screen. Tap this icon to reveal additional options for handling your selected photos.
Step 6: Create Your Video
From the dropdown menu that appears, select Save as Video. Your iPhone will immediately begin processing the selected Live Photos. The app automatically stitches together the motion from each Live Photo, creating one seamless video file. The processing time depends on how many Live Photos you’ve selected, but it typically takes just a few seconds.
Locating Your Newly Created Video
Once the conversion completes, your new video is automatically saved to your Photos library. You can find it in two places:
- Videos folder under Media Types in Collections
- Recent album in your main photo library
The video retains the date and timestamp of the original Live Photos, which means it might not appear at the very top of your library. If you’re having trouble finding it, try sorting your videos by “Recently Added” to see your latest creations first.
Sharing And Using Your Video
Once created, your Live Photos video can be shared through any platform, including Messages, email, social media, or cloud storage services. The video format is universally compatible, meaning recipients don’t need an iPhone to view it, unlike Live Photos, which only work properly with Apple devices.
This conversion method is completely free and uses only native iPhone features, so you don’t need to download additional apps or pay for editing software. It’s a quick, efficient way to preserve and share your favorite moments in a format that’s easy for everyone to enjoy.
Conclusion
Turning Live Photos into a single video is one of those hidden iPhone tricks that feels incredibly powerful once you discover it. With just a few taps, you can transform scattered moments into a smooth, story-driven video without using any third-party apps. Whether it’s a special celebration or simple everyday memories, this feature helps you relive and share moments in a more meaningful way. If you love capturing Live Photos, this is a must-try trick that makes your iPhone even more useful.
Follow Us: Facebook | X | Instagram | YouTube | Pinterest


